Reviews from my clients on Soundbetter.com. In case you are wondering about the names, Soundbetter doesn’t use last names!
“I always return to Mark for my Mixing and Mastering needs, his skills and experience are second to none. A great pro to work with on your project. He always works hard at getting your music to sound exactly how you want it, and sounding the best it can be. Delivering a high quality end product every time.” Bav
“Mark is a masterful engineer whose work is amazing. This was my third time working with Mark, who once again delivered a mix which improved my song dramatically. For this particular arrangement, I wrote several instrument parts (piano and various guitars) to be played in the same register. In his mix, Mark was able to get clear separation of each part and create a truly outstanding final mix. He and I communicated very well with each other, and without hesitation, I highly endorse Mark.” Benjamin J
“Mark did an excellent job mastering my song. Communication was detailed & it took a few online conversations to discuss style choices, because he’s meticulous and we both wanted the best results possible. Many thanks!” Sarah K
“Mark is a brilliant world-class engineer with obviously high standards who I simply trust with my art. Again, Mark perfects another single for me. The last of a six release cycle, but I’ll be pinging him again for more to follow. I’ve said it before: his attention to detail and to my specific requests is spot on. Regardless of the instrumentation on any given track Mark finds a way to create space, energy and detail where it is most needed.” Wilson R
“Mark is amazing! Exceptional mastering engineer and sound person. I hope to work with him in the near future again.” Peter E
“Mark is a great professional in a jazz mastering! He gently touched my track, made it sound much more clear, fresh and transparent.” Дмитрий В. Dmitry
“Mark did a fantastic job mastering my acoustic jazz album. He was a pleasure to work with!” Shawn G.
“Mark did awesome work with my tracks – as mixing engineer he gave me amazing visions of my music with results of the highest quality. As mastering engineer Mark improved all my tracks so much, now I’m feeling proud of each of them. For me it was a great pleasure to work with Mark, highly recommended!” Nikita V.
“Great skills, experience and super easy to work with. A musician working with musicians, 100% recommended.” Valerio F
“Very easy to work with, and the sound of his mastering was incredible. Would recommend to any jazz/fusion artists looking for good punch and clean sound.” Matt G
“It has been a pleasure to work with Mark on my music!! He is attentive to your needs, your taste, your requirements, and really adapt the sound to them. Thank you very much for this great service!!” Stéphane Q.
There are various factors which determine an EQ’s sound, the shape of the curve, various saturation characteristics, time domain shifts and more. In this article we’ll be looking at all these factors and their importance when considering an EQ. Then I’ll look at some of my favourite software EQs and why I think they stand out from the crowd.
The first thing to consider is the shape of the EQ curve which. If you are not familiar with the basics of EQ curves this article https://www.izotope.com/en/blog/mixing/principles-of-equalization.html gives a good overview.
As we all know EQ has two primary uses, to boost certain frequencies and to cut certain frequencies. The type of curve the EQ has is likely to be very different depending on whether it’s used to boost or cut. When you boost, as a rule of thumb, the smaller or tighter the the Q (the width of the bell) the less transparent the EQ will be. However smaller Qs also give you more precision in the frequencies you boost. You can boost a small range of frequencies, like the attack of a kick drum, without affecting other nearby frequencies which you don’t want to boost. Used carefully tight Qs are an essential mixing tool. But without care, they can easily make things sound over processed and unnatural. A wider Q on the other hand will sound more transparent and therefore more natural. However you won’t have the ability to be very specific about the frequencies you boost. It’s all a matter of which tool you need for the particular job at hand. When used for cutting, the width of the bell takes on a completely different character. Using a small Q to cut, you can often very transparently remove a problem frequency. So it has almost the opposite effect of boosting with a small Q.
However there is an awful lot more to bell shapes than simply the width of the Q and these differences can have a profound effect on the sound of the EQ. Consider the following EQ shapes:
Mid Q boost. A good shape for general EQ work as it has a balance between precision and transparency.
Narrow Q boost. More precise but also more resonant, meaning potentially less transparent.
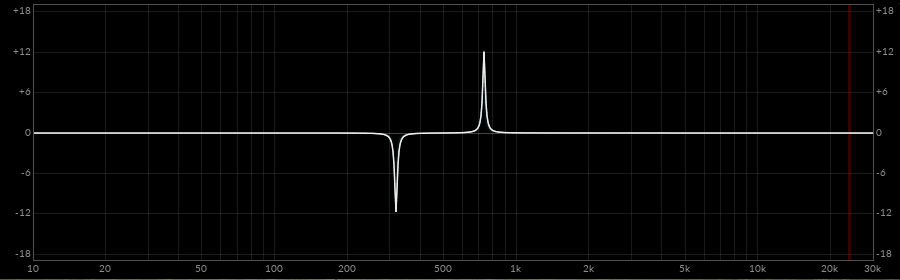
Ultra narrow Q cut and boost. An ultra narrow Q can be useful for surgical cuts, but will be far too resonant to use as a boost unless you’re after special effects.
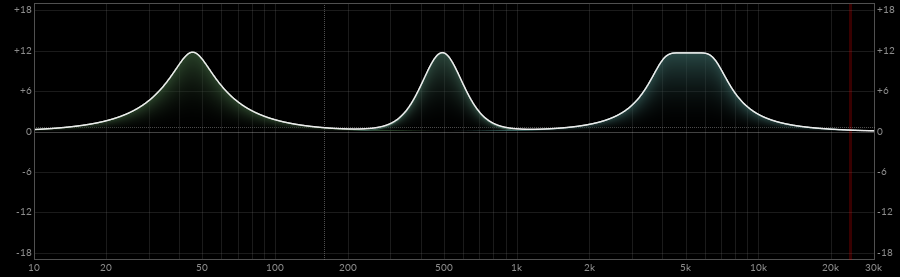
Three bands with similar Q width but different bell shapes. Note that with the first two curves, although the top of the bell is a similar width, the shape of the sides of the slopes are very different. The third curve has similar shaped sides to the first, but the top of the bell is very different from either of the other two. Each of these bell shapes impart a different character to the sound.
Pultec style EQ curve, where two closely overlapping bands are moved in opposite directions.
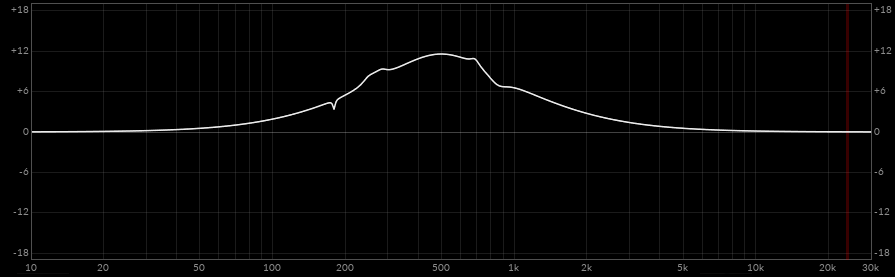
Complex bell shape. Some analog EQs will have complex shapes due to idiosyncrasies in the circuits. This can affect the character of the EQ.
What is interesting about the complex shape is that in circuits that produce these, the shape itself will very likely change depending on the amount of boost or cut, the frequency it’s set at, the Q and may even vary depending on the level of the signal going into it. So there’s a lot of complexity there.
So potentially you can have a complex curve that is changing subtly as the incoming signal coming changes. At the same time you could have a complex set of added harmonic saturation being imparted by the circuit which also changes depending on the input level and frequency. You can imagine that at this point the EQ can potentially be something akin to a living breathing entity. Done well this can sound fantastic, which is why the best hardware is so revered. But it’s a very fine balance, get it slightly wrong with a hardware pice which is not well maintained, or one which was not brilliantly designed, you end up with something that simply makes a mess of the sound.
In the software world, as long as you are using plugins from a good manufacturer, you avoid the potential hardware has of muddying the sound. If the plugin is an emulation from a high end manufacturer, then they will have emulated a great hardware piece which was in prime condition, or revered for some unique characteristic. Noise and unwanted distortion can be removed, added to taste, or even increased beyond what the hardware could produce. Alternatively some audio software designers have used component modelling to idealise the hardware or used extended modelling techniques take the plugin to places beyond the capabilities of hardware. For example, you can vary the kind of saturation that is produced by an EQ independently of the EQ type. So you could use an EQ shape form one piece of hardware and add the saturation from a different piece of hardware. Or have a range of different saturations that rather than being modelled after particular hardware are chosen purely for their subjective musical qualities. These can be added to which ever EQ curve you choose. There are many incredibly useful variations on these ideas available in software.
There are also an increasing number of plugins which add signal dependent saturation. In other words the amount and character of the saturation changes depending on the level and frequency content of the audio going through it. This is exactly what happens in hardware and why great hardware sounds the way it does. The great thing from my point of view is that in the plugin world there is enormous potential to take these sound enhancing properties well beyond the reach of any hardware. This is already beginning to happen with some of the more forward looking developers.
Waves H-EQ offers independent control over EQ curve, saturation, and noise based on a variety of modelled hardware EQs as well as some unique digital EQ curves
As if all this wasn’t enough, there is actually a lot more to EQ than just shape, saturation and non-linearity/signal dependancy. There is the whole area of the time domain. All EQ causes time domain distortion. This is not necessarily a bad thing at all. It can in fact be a very good thing. This is not distortion as in fuzz or sound break up. It’s not the same thing as saturation or harmonic distortion. Distortion is a broad term. Any change at all from the original signal could be classified as distortion. By the same token you could say that in a live venue the effect of the air on the sound as it travels over distance, and the reverberation and vibration of various surfaces in the venue, are all types of distortion, as these things all change the sound’s frequency, dynamic, transient properties. and more. It’s more a matter of whether a change to the sound, distortion if you will, is pleasing to the ear or not. Does it enhance the music or take away from it?
With this in mind, it might be better to think of these time domain distortions more as different tonal qualities imparted to the audio by the EQ. Transients can be smeared in a very pleasing way or in a not so pleasing way. This doesn’t just affect the momentary attack of a sound, it can effect a much wider portion of the sound. Analog EQs or emulated analog EQs are often characterised by specific time domain distortions. But purely digital EQs also distort in the time domain, all EQs do. So it’s a matter of, how much distortion and whether its a distortion which enhances the sound or takes away from it. The more extremely you boost EQ, the steepness and shape of the EQ curve all affect time domain distortions, whether it’s analog or purely digital EQ.
Linear phase EQ, which can only exist in the digital world, is compltely free of one kind of distortion known as phase distortion. For this reason it can be very useful in various mixing and mastering situations. However, Linear phase EQ has the potential to cause significant time domain distortion in the form of pre-ringing. Pre-ringing in certain situations can for example, destroy the transient of a drum hit. So linear phase EQs are not a magic bullet, they need to be used with care, but are an essential tool for certain tasks.
So with all the EQs out there, which do I personally use the most and recommend? Here’s my list with some comments about why I like each of these EQs.
Transparrent EQs
Eiosis Air EQ. I really like the clean transparent sound of this EQ, and is along with the FabFilter Pro-Q3, my go-to work horse EQ for many tasks. It is also one of the most versatile and precise EQs on the market. All the bell shapes shown in this article were made in seconds using the Eiosis EQ. Though less important than the other features, I find the unique visual display of the curves the best on the market as it calibrated to the human ear rather than being linear, which makes it incredibly intuitive to use.
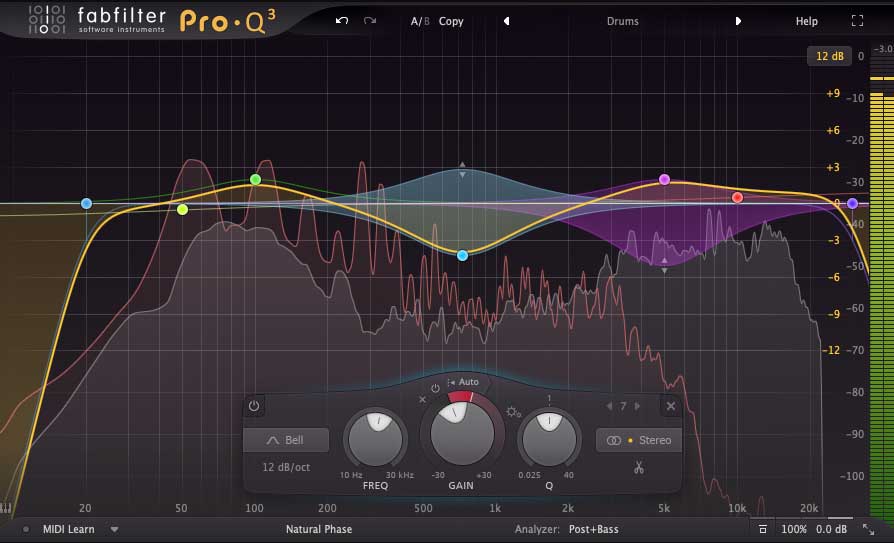
FabFilter Pro-Q3 is another great sounding and ultra versatile clean, transparent and precise EQ. I find myself using this as often as the Eiosis EQ for precision work. It has some innovative features and works as a dynamic EQ as well.
Character EQs
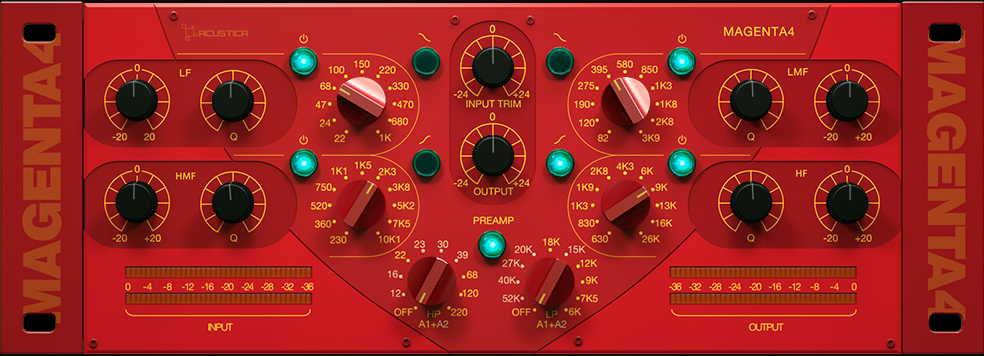
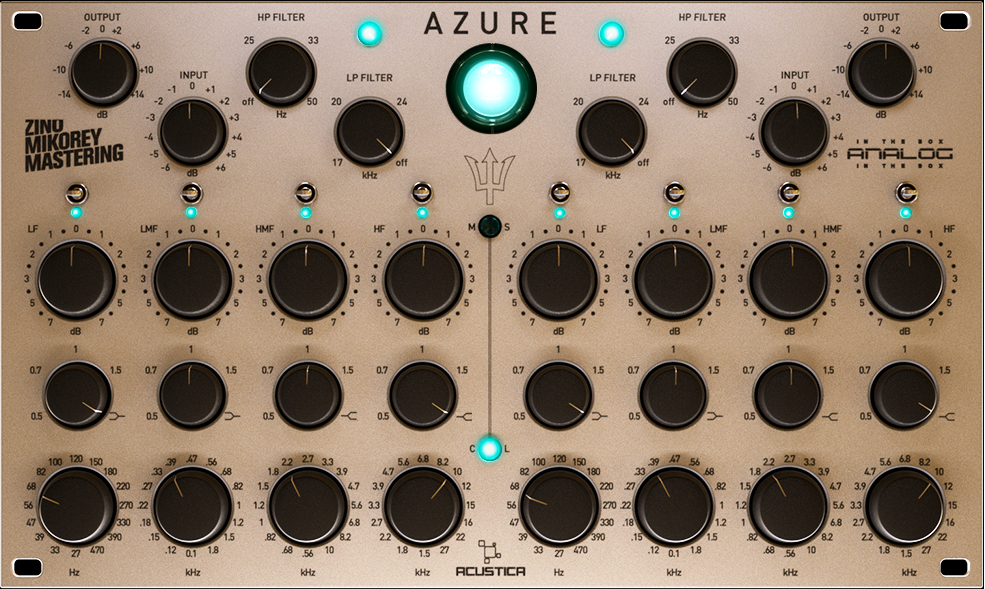
Now on to the EQs which by design are not as transparent or as precise, but which impart some special sonic qualities to the sound. This is where, time domain smearing, saturation and complex curves really come into their own. Here’s a typical example of how these kinds of not so transparent EQs can be essential tools. A world class, beautifully maintained grand piano is not something you often find the sorts of small studios jazz musicians can afford to record in. So it’s very common to have a piano which though well tuned, is sounding pretty lack lustre. Often what these pianos, typical of smaller studios, have are worn hammer pads and old strings. This results in a lack of upper mid tone and the ability to project well on a recording, especially in a dense arrangement. In short the piano sounds a bit dull and lifeless even if the player is world class. What it really needs is a boost in the upper mids to help it project and sound more like it would if the hammers and strings were well maintained. However, typically in this situation if I boost the upper mids with a clean EQ you just don’t get the effect I’m after. Though it boosts the intended frequencies, because it’s so clean it also bring out details in the tone which are the result of a worn instrument. In short, there’s a thinness and spikiness to the sound due to the old felt and slightly dead strings. Where as the same boost with Acustica-Audio Azure or Magenta will smear those boosted frequencies in a very nice sounding way, resulting in a thicker sweeter sounding upper mids on the hammer attack. The result is a lot closer to the sound of a well maintained piano than you ever get form a clean EQ.
Acustica-Audio Magenta. This EQ based on a famous hardware unit, is a long way from precise or transparent. However it can add weight to the low end, smoothness to the mids, and a sheen to the top end that a clean EQ simply can’t achieve.
Slate Digital FGN Neve EQ emulation. This is a dirty and aggressive EQ, but it can bring out the breathiness of a vocal or the presence of a snare in a way no other EQ can.
Waves Scheps 73 same as above.
Acustica-Audio Azure, a great mastering EQ which can really deepen the sound stage, but also very useful on single instruments which have a broad frequency range.
Acustica-Audio Sand based on an older SSL hardware EQ, this EQ is simply amazing on drums, the low end is exactly what you want to hear on a kick drum and it’s a perfect EQ for shaping a snare sound.
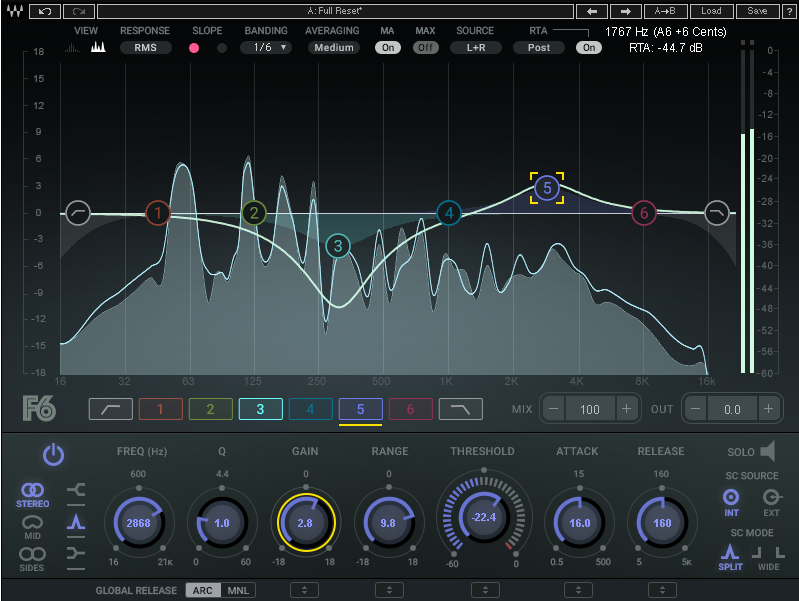
Waves F6 dynamic EQ. Though I have several excellent dynamic EQs, I end up using this one a lot. It’s easy to use, and very versatile. I like the ability to change the attack and release, and the ability to work in Mid Side and change the EQ shape of any band. Importantly, it also sounds very transparent.
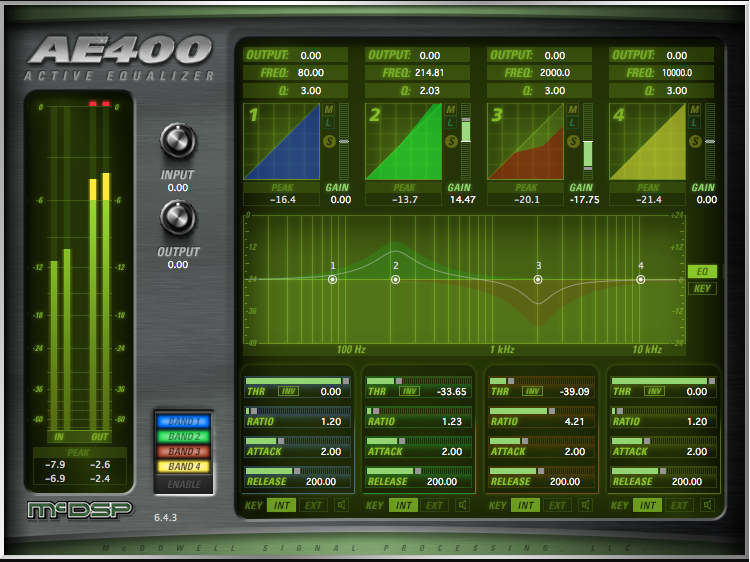
The other dynamic EQ I return again and again to is the McDSP AE400. I find the F6 easier to use, but when I can’t get what I need from that, the AE400 is the next one I go to. It sounds very transparent and reacts a little differently than the F6, which is why it’s a good companion dynamic EQ. It is also extremely versatile, offering control over attack, release and even ratio in addition to gain.
Specialist EQs
Kush Audio Clariphonic. A unique set of parallel high shelf EQs which are amazing on overheads and great for bringing out clarity in a transparent way on a variety of sources.
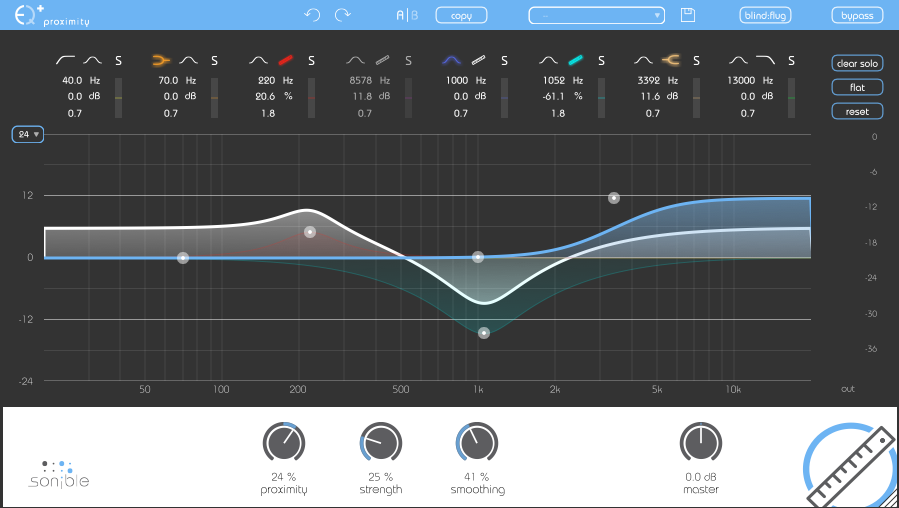
Sonible Proximity EQ. Another tool which makes use of the emense potentail of software. This EQ can reduce room ambience based on any EQ curve you set up. I’ve used this EQ to salvage recordings of live performances which would have otherwise been far too reverberant to use.
The Brainworx Plugin Alliance bx_panEQ allows you to control the panning of specific frequency areas of the audio. This can be a useful tool for fixing problems in a master were a remix is not possible (such as a live or historic recording) and can also be useful for sound design.
And there are so many more great EQs! These are just a handful which are either my goto EQs or EQs I felt deserved a special mention. I have many other EQs which I use regularly depending on the situation. Many of them have one thing which they do brilliantly. Others simply impart a special character that I need on certain projects.
I hope this article has given you some insight into the wonderful pallet of tonal shaping different EQs offer and some of the reasons they sound so different form one another.
We provide the opportunity for one minor revision within our normal mastering rate.
What does this mean? We will send you a link to high res mp3s of the mastered tracks to listen to. Then if needed there can be a round of minor changes, for example you might want a little more bottom end on a particular track or a little more top end on another track. We then make these changes for you for the final master. If you feel you need more extensive revisions or alternative versions for labels etc… these will incur an extra fee.
Don’t feel you need to make revisions necessarily, many of our clients don’t. Our experience is that it’s best not to over think it. The master we give you sound better to you than before it was mastered and there isn’t anything immediately obvious that you feel needs to be different, it’s probably best to trust that we’ve done what’s needed.
Mistakes made in certain listening situations
The mistake some people make is to listen to the masters in someone’s car and suddenly realise the bass is too loud or not loud enough. Or listen in a friends house and for some reason there the top end seems too much or too little. Then temptation can be to use these isolated listening situations to judge whether the master needs to be changed.
It is important to realise that car stereos often hugely exaggerate or under represent certain frequencies. This can vary enormously from one car stereo to the next so judging your master on any set of car speakers is not a good idea. Similarly living rooms typically have parallel walls which have not been acoustically treated. This will cause phase cancellation which will increase or decrease the highs in the music. The corners of the room will create bass modes which will multiply or subtract bass frequencies. Again these effects can change dramatically from one living room to the next. And that doesn’t even take account of the huge variation in hi speakers.
Our advice when listening to your master is to choose a listening environment and a hi-fi system you know incredibly well and have listened to countless albums in. Then, if listening in the familiar environment, you compare your master to a number of other albums of a similar genre and you feel your master needs an adjustment, that may be worth asking for. But it’s very likely a mistake to base changes on listening anywhere other than somewhere you are intimately familiar with.
One of the main points of having your music mastered by a professional mastering house is to avoid these problems. A professional mastering studio will be acoustically treated at great expense and effort to remove any sonic issues or distortions from the room. They will have speakers and amplifiers which are completely flat across the entire frequency spectrum. They will have a mastering engineer with vast experience who knows how to make your music sound as good as it can across all the variations that real life listening situations can present. Of course it goes with out saying that at Heron Island we have all these things!
You are welcome to attend the mastering session but there is a small extra charge as it generally takes us longer to create a master with the client here.
We suggest you attend the session if you have strong feelings or specific ideas about how the final master should sound. If you can’t attend the session (for example if you are in another country) but would like to have some input, we suggest a Skype session or phone call with our mastering engineer. This will give you the opportunity to discuss the music while the engineer listens to the tracks and talks with you.
Otherwise you can leave it up to us to make your master sound great.
There is no difference in sound quality between 88.2 and 97 KHz (or any higher rates) because they both extend miles and miles beyond any human hearing range. If you hear a difference, it will be because your converter (DAC) is not working as well as it should be with one of these sample rates. A good quality converter should sound equally good at any higher sample rate. However not all converters are created equal and some are good at covering one sample rate, but not so good at converting another. The good news is that converter technology gets better every year.
Reasons to choose one over the other
You might want to consider the primary destination of your audio. If you intend to release on CD, 88.2 KHz might be a better choice to record at. Conversion from 88.2 to the CD sample rate of 44.1 KHz involves much simpler calculation and is therefore likely to be a cleaner conversion than moving from 96 to 44.1 KHz. However if your primary destination is film or video, 96 KHz might be a better choice as the standard for video is 48 KHz, which is an easy conversion calculation from 96.
Having said this, if you use world class sample rate converters like iZotope RX5 which we use at Heron Island, you will not hear any degradation converting from either 88.2 or 96 to either 44.1 or 48 KHz.
Is there really a difference in sound between lower sampling rates like 44.1 and 48 KHz and hi-res such as 88.2 and 96 KHz?
Yes there is but it’s not for the reason you might think. It’s not likely to be the difference in high frequencies that you’ll hear. The range of human hearing is 20 Hz to 20 KHz. A 44.1 KHz sample rate (the sample rate of audio CDs) does reduce the high frequencies a little bit above 18 KHz. Higher sample rates do preserve these ultra high frequencies. Even a 48 KHz sample rate can represent frequencies up to 20 KHz (the limit of human hearing). However the truth is that studies show most people over the age of 30 cannot hear anything above 17 KHz and this reduces further as you get older.
Yet people reliably report that high sample rates like 88.2 and 96 KHz sound better than 44.1 and 48 KHz. The reason for this, as the legendary mastering engineer Bob Katz explains, is in the way currently designed digital to audio converters (DACs) work. When converting from digital to analog for playback, it is very difficult and expensive to produce an undistorted signal with lower sample rates like 44.1 or 48 KHz. There are at present no commercially available systems that can reproduce these sample rates without distortion. However, once you are at a high sample rate like 88.2 or 96 KHz a good converter can produce a completely undistorted analog signal with ease. So the difference people are hearing, is not the high frequency content, but the fact that lower sample rates cause the converters to distort the analog signal. For the tech minded, this is due to ripples in the bandpass filter cased by restricted high pass bandwidth in lower sample rates. For more in formation and detail on this we recommend Bob Katz’s excellent book Mastering Audio: The Art and the Science 3rd edition.
There is another very important reason to record at either 88.2 or 96 KHz. Digital processing tools work much better at 88.2 and 96 KHz than they do at lower rates. This can have a big effect on the quality of the sound both during mixing and mastering.
Also the audiophile market has moved to hi-res audio. Hi-res music vendors require 88.2 and 96 KHz.
These days more and more music is being recorded at 88.2 or 96 kHz. There are various reasons for this. One important reason is that many audio plugins used in mixing cause aliasing (unpleasant digital distortion) at the lower sample rates of 44.1 or 48 kHz. However recording at 88.2 or 96 kHz will mean that this distortion does not occur. Some plugins oversample the audio to reduce or remove this distortion, but many do not (including many from the major vendors). This distortion accumulates with each plugin used so the results will vary a lot depending on how your album is mixed. However since recording at 88.2 or 96 kHz avoids this whole problem, it’s worth considering.
We can work at any bit depth or sample rate, so don’t despair if your music was recorded at lower rates.
The difference in sampling rates is a lot more subtle to the point where they may not be noticeable on all listening systems. Many people record at the lower rates of 44.1 or 48 KHz due to CPU restrictions of the mixing computer. Although these rates are fine, 88.2 or 96 KHz will sound slightly better on many playback systems, especially audiophile systems. If your target market might be audiophiles, 88.2 or 96 is recommended.
It’s not that these higher rates actually contain extra musical information, the issue is to do with the filters playback systems need to use to decode digital. Higher rates allow playback systems more room to work, and many will sound better as a result. Some people even record at 192 KHz, however there is some evidence that rates this high are actually less accurate due to the maths involved.
We feel that 88.2 or 96 KHz are a very safe bet, and this is what we recommend, unless your mixing computer can’t handle them. If you have recorded at 44.1 or 48 do not change to a higher sample rate. The difference between this and higher rates is small and will not make or break how good your music sounds.
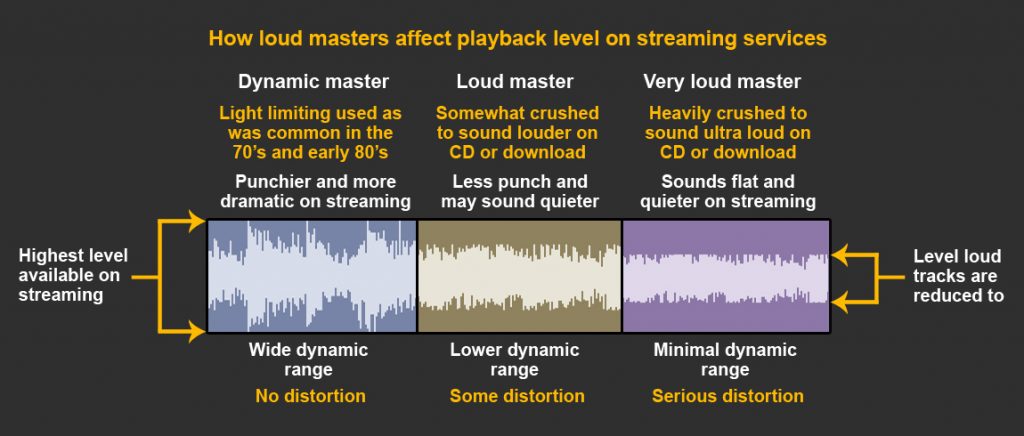
Streaming services automatically turn down tracks which have been mastered to be loud. The result is that a loud track may actually sound quieter on streaming services than tracks which have not been mastered to be loud. Even if it doesn’t get turned down enough to sound quieter, it certainly wont sound louder. However it will have less dynamic range and will probably sound more squashed, distorted and dull next to other tracks which were not mastered to be so loud. Below is a diagram to explain why this is the case.
Why is this?
There is only one way to make a master louder and that is to compress the dynamic range. The dynamic range is the difference between the loudest sounds and the quietest sounds in a piece of music. The louder you make the master, the more you need to compress (reduce) the dynamic range of the music. A very loud maser will have a very small dynamic range.
What you need to know
This processing basically shaves off all the loud peaks in the music. It’s a very destructive process and can audibly degrade the sound, especially for jazz recordings. The new standards mean this kind of destructive squashing will no longer result in your music sounding any louder on streaming services.
The choice is yours
You can have your music mastered to sound really loud on CD if you don’t mind the way it affects the dynamic range. We are happy to give you two versions, a reduced dynamic range master for CD and a fuller dynamic range version for streaming and vinyl.
Keep your mix at the same sample rate it was recorded at
Whatever resolution you record at be it at 24 bit, 44.1 kHz, 24 bit 88.2 kHz or 24 bit 96 kHz, you should keep it at this same resolution all the way through to mastering. Don’t downsample or upsample your mixes, if anything like that needs to be done, let us do it here with our specialist tools.
Use modern high quality plugins in your mix
The sound quality of plugins varies enormously and huge advances in the quality of plugins have been made in the past few years. Avoid old or cheap plugins and avoid 32 bit plugins, you should be working with 64 bit plugins only. Splashing out on high quality plugins is worth the investment. Your music will be around for a long time, our advice is not to cut corners now by using cheap or old plugins. If you have recorded at lower sampling rates like 44.1 or 48 kHz, make sure all the compressor, saturation and character EQ plugins used employ oversampling. If they don’t, you risk introducing aliasing distortion into your mix (at type of undesirable digital distortion). Recording at 88.2 or 96 kHz avoids this problem, so if you have not yet recorded, we recommend using these higher sampling rates.
Do not use compression or limiting on the master bus
You are better off leaving that up to the mastering engineer, that’s what they specialise in. We have a range of world class bus compressors and limiters and vast experience. If you have already compressed and limited your master bus, it will severely limit what we can do to help your mix. If you really like the sound of your bus compression then send us two mixes, one with and one without the compression. Don’t use a bus limiter at all, you’ll simply be tying our hands if you do. Same with bus EQ or multi band compression, leave that up to us.
Leave some headroom
With 24 bit files there is no need to keep the levels near 0 db on your mix bus. It’s better to give us a few db headroom so we can bring the level up during mastering using our specialist tools to make it sound great.
Dither your bounce
You should bounce to a 24 bit wav file and stay at the same sample rate that your session was recorded in. Turn on dither in your DAW when bouncing or use a high quality dither plugin (Like PSP or Ozone dither) as the last plugin in your master bus chain. Why do I need to dither if it’s a 24 bit file? Modern DAWs work at internal rates higher than 24 bits, so truncation will occur when bouncing to 24 bits (even if the original audio is 24 bits). This truncation is minor and it’s no big deal if you don’t dither to 24 bits, but it will improve the quality further down the line if you do dither.
Zip your files
If you are sending us your mixes via the internet alway zip them first. If there is some file corruption during transfer the zip file will not open at our end and we can ask you to send it again. If it’s not zipped and there is transfer corruption, it may still play back at our end but there may be degradation.
Send us concise notes
In order for us to work with your mixes we need a text document which includes a list of the file names of all the audio files you’ve sent us. Next to each file name we need the actual name of the song exactly as it will appear on the final album. We also need the IRSC code (unless this is provided by the pressing plant) for each track.
CDpressing
We either can create a DDP file or provide you with separate 16 bit files for CD depending on which the pressing plant you use requires. If we are creating a DDP file we will need all the track names and the ISRC code for each track. If your pressing plant wants separate 16 bit files, then you will either give them the ISRC codes or they will provide them for you.